Pages

30 June, 2013

Cupcakes!

Good morning, folks.
Last week, I was proud of myself for making lots of fun classroom supplies. They are waxing the floors of my school and I have not been in my classroom in quite a while. That meant I had more time to research and slowly walk around Dollar Tree to try to find inspiration for my classroom.
I have already posted about several things including
monster bookmarks,


the birthday box,


and I even posted about an awesome find I discovered at my Dollar Tree for crayon containers.


Today, you get a look at my students' back to school present. (Part of it.) You see, I decided a few weeks ago that I wanted to bring in this next school year with a bang. Our open house night is the evening before school starts and I really wanted to get students excited about this next year. I decided to treat it as a party. Students will be welcomed with an awesome sign, be directed around the classroom with more adorable signs, and then collect a "treat" as they leave. What is the stereotypical party dessert? Cupcakes!
I had so many allergies last year (gluten, dairy, every type of nut) that I knew these babies would not be real cupcakes. (Besides, we cannot make any food item we want to give our kiddos and I don't really want to buy them a cheap cupcake from a grocery store or spend big bucks on delicious cupcakes from a bakery.)
Meet my faux cupcake complete with a candle.


Mmmm. The idea came from inspiration while at a dollar store. I had seen many cute fake cupcakes, but they looked messy or difficult or expensive to make. These ones cost about fifty-eight cents (I had everything except for the bowls and ramekins already).

Ingredients:
1 small prep bowl (the ones at the store came four for a dollar)
1 plastic ramekin type bowl (I bought these at the dollar store as well in a three-pack, but I can't find a link for them)


3 Zots
Colorful ruffle ribbon
Hot glue
M&Ms (or other small treat)


Directions:
1. I like to start making cupcakes beginning with the frosting, don't you? Begin by gluing the ruffle ribbon onto the prep bowl. (You could also paint the glass or just leave it. Either would look great. Or, for those glitter lovers out there, you could paint it with glitter paint. Super cute.)


2. Fill the cupcake (plastic ramekin) with desired treat. I used M&Ms because I happened to have some.


3. Place some Zots on the lip of the ramekin and firmly place the prep bowl on it. You could also place some hot glue dots onto the glass lid, wait a few seconds, and then press it onto the plastic bowl.


4. Celebrate!

An alternate step 4 is to add a candle. Fake candles are super easy to make also.
You need cute straws (I used striped paper straws) and yellow tissue paper.


Cut the straws to whatever candle length you would like. (My cupcakes are going on a cupcake stand eventually, so I wanted short candles, but super long candles would look great this week for the 4th of July.)


Just place two small squares of tissue paper on top of each other.


For the next step, I pushed the straw into the center so that I could twist it like so...


Finally, I dabbed a bit of hot glue in the straw and stuck the twist side into the straw.


You can just add that to the top of your cupcake! The day of our open house, I will probably add a dab of hot glue, but today I used another Zot to adhere it to the cupcake and it worked perfectly.


Cupcake a la candle. Perfect for bringing in a new year.

Linking up

27 June, 2013

Crayon Boxes

Do you know what I dislike? (Okay...I do dislike people touching my hair when it's wet and I hate pointy things next to my eyes. I also do not like it when people break rules, but those are posts for another day.) I dislike crayon boxes.
I'm sure the lovely folks at Crayola make those boxes as best they can, but the cute cardboard boxes were not built for everyday classroom use. I just threw away all my crayon boxes from last year and every single one of them looked like it had been through, well, 35 different fourth graders.
Do you know what I dislike most of all? You know those times when a student is carefully and quickly cleaning up from coloring something and just as they jab the last crayon in the box, they jab a little too hard and the back comes off? Crayons are flying everywhere. Crayons do backflips and kung fu moves just to get out of that box (at least in my classroom).
I love all the soap boxes, in fact, the soapbox for crayons was one of my first pins. My only problem was finding a multitude of inexpensive soap boxes.

Then came the day I was perusing Dollar Tree's website and found these Lock-Top Snack Containers two pack...with lids. Could it be? Would that container possibly fit a heap of crayons?

After two Dollar Tree store stops, I found them! The only problem was that there were only 11 packages in stock and I would need at least 16. Instead of being impulsive and buying all they had on the spot, I just grabbed one to check it out.

I played with the snaps for a while and they appear to be sturdy and kid-friendly. As for the crayons, they fit 24 regular Crayola crayons without even breaking a sweat. (Although to see a plastic container sweat would be pretty strange.) Two for a single dollar?
Not too shabby.


*Small update: I went to four stores to get all the boxes I needed (they were out at two of the stores). A saleslady told me that these small boxes go very quickly whenever they get a shipment in.

26 June, 2013

Birthday Box

Many years ago, I received this awesome box. I loved that box. I kept all my favorite notes and awards in that box. I re found it the other day. After glancing at everything, I admit, I tossed it all. I can just tell my future children about all my awesome 4H ribbons.


Once I found the box, I knew I would have to use it in my classroom somehow. There was only one slight problem with it. Do you see the problem?


Yup. In the bottom corner of the box, something...did something. It looks absolutely gross. It really is not that bad. (Although because of this gunk that ate away at the paper, you can see that the box is made of wood.)


I really could not think of anything to do with it. I did not want to have to commit to something that I may only use this next year. I thought of something I know for sure I will be doing year after year after year. Birthdays! I grabbed some vinyl and cut out some cute pink vinyl for the top.


For the inside, I carefully cut out paper that matched perfectly with the teal and purple color scheme. I decided to go with a quote from my favorite birthday song. (Once I cut out the light blue, I realized I didn't actually want that color; I had been planning on doing yellow. Ugh. I hate to wasted it. All 3 inches.)


This is the bottom part that looked disgusting. Pretty nicely covered up.


And a look inside the entire thing.


I like it. Last year for birthdays, all I did was write them a letter, give them a pencil, and bind a book full of birthday wishes from their peers. I think I may have to up the celebration stuff this year. I will put a variety of birthday present choices in the box and let them choose.

24 June, 2013

Monster Bookmarks: A back to school present

Last year, as a first year teacher, I rehearsed and went over the detail of every minute of the first week of school. I had plans, backup plans, and emergency plans. I read books and talked to expert teachers and thought I had considered everything. That is, until the students had their first silent read. A chorus of voices inquired about bookmarks. Bookmarks? Growing up, I had always used a scrap of paper, the flap of the book, or any other nearby object that was flat and small.
With the speed of an ocelot, I grabbed my paper cutter and made mincemeat of some colored paper.
This story has obviously stuck with me and this year, I made them some real bookmarks.

Meet, the monster bookmark.

He's adorable, lovable, and practical. I bought the pattern from the Silhouette Shop here and made a few modifications.
First off, I think that if you make a monster just like the one the picture shows, he just looks depressed.


See what I mean? Sad little depressed monster. I might change my attitude about reading if this unhappy dude was there to greet me every time I grabbed a book.
I also added a dotted line on the folds to make folding easier.

In total, 39 mosters were born today.


36 of those were for my students and 3 were made with some of my nephews in mind. This picture was taken when I had assembled the bodies of all the monsters. 12 pieces of your favorite scrapbook paper can make a lot of cute mosters.


These are three of my favorites. Mmmm. I love paper.

These are just one of the things I am giving to my students in a couple of months, but I am terribly excited about them.


23 June, 2013

Brother, can you spare a crayon?

Wow.
I am not sure where this past week went, but I certainly did not make very much for my classroom. Granted, I went to a city in the middle of nowhere for a family reunion for my paternal grandmother's family. I also got a free $20 gift card from my local mall and enjoyed a date thanks to that moola. I started running more regularly. I spent time with my new team and we hashed out our social studies curriculum. I put away all my stuff into my new classroom and realized I really do not have a lot... Those are the only excuses I have. (Although, now that they are all written down, I realize that it is more than I thought.)

The only thing I physically made is the start of my student supply station. (Don't you just love a good alliteration?)


I took these awesome Sterilite drawers, grabbed my Silhouette, and made simple signs for the drawers. I used the Silhouette pens to write the different colors. (The orange label is not centered and it is driving me crazy. I figure that when it is sitting in a back corner of my classroom, I will not notice it.)


This past week I also bought some clay from Hobby Lobby (50% off, baby!) because that was my students' favorite reward last year. Come in and play with clay during recess. We'll see if my students this year love it as much as they did last year.


I also received an awesome poster from Vistaprint that I made. Sigh. I love humor. I kinda want to get one of those "stop clubbing baby seals" posters. We'll see.


18 June, 2013

The "before" pictures of my beautiful new classroom

(As taken by my phone's super posh camera.)
Friends, acquaintances, and strangers,
I give you...my scrumptious new classroom. I could practically live in that lovely place.

Just as a refresher, here is a picture of my old classroom right before I left it for the last time. Three words: No storage. Orange. (Their school colors don't even include orange. I guess it was the color of the 70s.)

I did love how wide it was and the fact that on 3 out of the 4 walls, I had floor to ceiling bulletin boards.
Now for my new classroom. I love it. I will let the pictures do the talking.
Look at all that storage! Oh. What is that, hiding behind the stacked desks? Let's zoom in for a closer look, shall we?

A drinking fountain and sink! Jumping jellyfish, I feel like it's my birthday.

As if one wall of built in storage was not enough, I also have storage on the opposite side. The awesome thing about these drawers is that they all double as filing cabinets. It gets me giddy just thinking about it. (Plus, did you notice that only half of the lights are turned on? Yup. I can turn on just half of the lights.)

Did you think that was all of the built in storage? Sigh. There's more. There is also a small white board at the back of the classroom. I feel totally and completely spoiled.

And...an unimpressive view of the front of the room. Long whiteboard, two small bulletin boards, and a practically swooning photographer behind the camera.

Now I have to figure out how to somehow decorate that lovely room to look even better.

16 June, 2013

My New Table Numbers

I loved my table numbers last year and so did my kiddos. In fact, we had an end of year auction and the numbers were available to bid on. They definitely went for the most amount of money. I gave them away because, although I loved them, they were not the sturdiest things around.

I did want to stick with hot air balloons. I have started to really love hot air balloons for whatever reason. I even have a small (but growing) Pinterest board of my favorite balloon crafts.

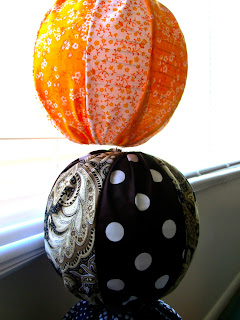
I was 100% inspired by this project. It sounded easy enough and I was so excited that I finished all 9 of my table numbers in just a few days. (It took a couple hours, start to finish for each one. It would have taken way less time if I did not have to make the numbers, baskets, and bunting.)

I started off with the cheapest paper lanterns I could find at Zurchers. Because these were to be part of the decor for a room full of 5th graders, I wanted to make some small balloons. Now that I have made these ones, I want to make large ones for my own home decor. Maybe when I someday have a nursery. (Emphasis on someday.)
End of tangent. I bought 9 8" white paper lanterns at $1.50 each. They were the most expensive part of the ordeal.

Next came my favorite part: picking out the fabric! I chose to have 2 designs of fabric for each balloon. Because my lanterns were so small, I got away with buying 1/8 yard of each fabric I chose. I cut both strips of fabric in half twice. This gave me 8 short rectangles. I only used 6 of those rectangles.

Because I was lazy, I serged the panels together.

Once all of the panels were serged together, I looped them up so I made a sleeve. (I had to ensure that the circumference of the sleeve was just barely over 8" so it would fit snugly on my lantern.)

Next, I serged around the top and bottom of my sleeve.

Instead of making a draw string, I chose the lazy way. Using a needle and thread, I slid my needle under the one of the loops of the serged edge.

Once I had stitched all the way around, I pulled tight. Then, I pushed the lantern in the fabric to see exactly how tight/loose to make the gather.

Then I repeated with the other end.

Repeat that nine times, and the balloons were finished. 


I just had the baskets, bunting, and numbers left to make. Cue the Silhouette. One of my favorite crafting friends. (My favorite crafting friend is a three-way tie between my sewing machine, my serger, and my silhouette.)
I used a bushel fruit basket template to cut out the baskets. I like this shape better than the perfect cube I used last year.

I grabbed 5 different brown pieces of paper and cut out the baskets.


I also cut out lots of bunting.

I think the bunting adds an adorable, tiny detail.


Then there were the numbers. Ugh. Bless their little hearts. They look adorable but take forever to put together. I'm talking 30 minutes for the number six.

But they're 3D and I love them.

Then I just had to put them all together. Balloon, basket (with bunting), number.

I am in love.


In other news, the hubs and I got to see a special screening of...Monsters University on Thursday! I loved it. Mr. Wolf found it entertaining. I want to go back and see it when it comes out.

Linking up to my first Monday Made It this year.