Pages

14 July, 2013

Just a few things I made and how I fixed my lamination

This week, I was a little slow in making things. I put up my bulletin board fabrics and went to meetings instead.
I did, however, make two decorations for my classroom.
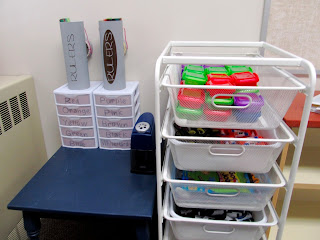
The first is a sign I will put over all the supplies I have for my students. I just cut out the letters and the banners then assembled it with washi tape on the top and bottom.


The other quick make is a calendar. I grabbed a pocket chart from the dollar store as my base. Then I cut out the numbers, days of the week, and cards for the months. It took a while but I wrote the names of the months down in a (hopefully) cute handwriting with an adorable green marker.


My cute husband thought I used different colors for the different seasons. If you want to think I did it that way, then do so. I will seem cooler to you.


The last thing I did was to fix my lamination.
I love the place I get to laminate all my stuff. They are practically across the street from where I live and they have always done an excellent job. I just had one slight problem the last time I went in. Let's take a look, shall we?
I had the darling lady at the lamination place laminate my new "clip" chart (something I will debut later). When I arrived home, I noticed something. Can you spot it?


Let's zoom in a bit.


Ah ha! The lamination on this part was not sealed. Now, as lovely teachers, you probably all know the fix to this, but I was not quite sure what to do. This is for anyone out there who is a lost lamination soul like I was.
Take your local iron and turn it to a low setting. Then, sandwich your failed lamination between a cardboard box and a piece of paper and then go over it once or twice. Seriously it was that simple. It took all of 5 seconds.


(And, no, this is not an ad for Black and Decker.)


08 July, 2013

Jewelry Holder

This week, I completed two projects (and nearly finished many others). Only one was for my classroom. It is a darling welcome sign.


The other was a jewelry holder.
I have this darling small set of drawers I received from my mother that I used to use for jewelry storage. It is beautiful, but whenever I keep my jewelry hidden away, I forget to put it on. I wanted to create storage that would showcase what I had and also keep it off the dresser.
I headed to Lowe's and bought a vent cover, two metal plates with holes screwed in it, and s hooks.


The assembly was super simple. I went around the outside edge of the vent and the plates with washi tape then and then hooked the plates to the vent with s hooks.


After I hooked the vent to the wall with removable Velcro, I attached more s hooks to hang up necklaces and then put my stud earrings on the metal places.


It looks like I became bored with a heat vent.


06 July, 2013

More pics and what my students thought of me

According to the janitors, I am official.


I finally brought the rest of my classroom stuff to my classroom. Hopefully I will be in this classroom for several more years because I am sick of moving.


While moving everything to and from the car, it felt like more than this.


I feel as though I need to fill up the rest of my storage that is not hidden away.


My little student supply area tucked away in a corner


I found some more boxes to put in my storage, but it's not enough yet.

Anyways...The last week of school, I asked my lovely students to write a letter to one of my future students to describe what they can expect in my class. I finally had time to read through them and thought they were hilarious. And strange. Some of them wrote that I get crazy if I eat sugar. Not sure where they got that from. I never really ate sugar at school.
Here are some highlights:
"She will tell random jokes that no one understands."
"NEVER turn your homework in late."
"She makes up songs at random times."
"She is very sarcastic."
"She mostly does crazy things in class and she sings what we're talking about."
"I've got to warn you, buy some listening ears because she can talk for hours!" (I was a little confused by this one until I read the rest of the girl's letter and realized she exaggerated everything she said.)
"Be careful, she might catch you when you have juice in a water bottle or pass notes." (Yeah. I once caught a girl with a dark liquid in her clear water bottle. When I asked her about it, she told me she put in the wrong drink that morning...)
"Now see here, don't get her name wrong. Pretend the j is an e."
"Always look forward to greeting her."
"She has cool brothers and sisters."
"She is insane (but not clinically)." (This one is my husband's favorite.)
"She sometimes spits water on the floor."
"She cares about your grades and that you are learning."
"She loves the Beatles"
"She is only strict when she has to be."
"You might want to bring cupcakes for your birthday because she can fit a whole cupcake in her mouth."
"Her pure awesomeness may be too much for you."
"Turn in your homework or else."
"One day she pushed her stool on the floor in the in the middle of an earthquake drill." (It also just so happened to coincide with the exact moment the principal walked in the door.)
"She sometimes jumps out the door."
"If you ever want to irritate her, don't. That's how I got in the principal's office." (The two were unrelated. Promise.)
"Just to give you a heads up, she knows where you live so don't mess with her."
"Don't let her jump in the hall with jazz hands."

And...my favorite letter. I miss those kids.


02 July, 2013

Welcome {sign}

I rather enjoy pennants/bunting. I had pennants at my wedding reception two years ago, I have pennants in my apartment, and I have pennants in my classroom.
I have been making pennants now for several years. Almost all of them have been the standard triangle (or square or circle) attached to string somehow. Last year I made an awesome one for the 100th day of school which I of course did not take a picture of and the fancy guy now sits in my classroom many miles away.
I decided to go a little crazy on a pennant and see how it turned out. I love it.
Here is what you need for a multi-layered pennant.


5 types of paper (One cut into 6" circles, I folded into an accordion folded rosette with a diameter of 5",  one cut into a scalloped circle of just over 3", one cut into a circle with a diameter of 3", and the last type of paper cut into letters that will fit in the smallest circle.)
Streamer paper
Stick-on pearl beads


Assembly is pretty logical. You want the biggest circle at the back and the smallest at the front. The only problem was that I had a large gap between the rosette and the scalloped circle. That is where the streamers come into play.
I taped one end of the streamer to the other end so it formed a loop. Then I started to scrunch together one edge of my loop.


Eventually I was able to flatten the loop completely. After taping it down, it fit perfectly in the gap.


I assembled it with hot glue and put three beads somewhere on each letter.


There you have it. A slightly more complex pennant. When it is completely finished (it will eventually say "Welcome to Mrs. Jaeger's class") I will hang it up with clothes pins onto some butcher's twine.